Introduction
Button mushroom (Agaricus bisporus) cultivation requires a nutrient-rich, well-prepared compost as the primary substrate. The compost not only provides essential nutrients for mushroom mycelium growth but also serves as a base medium that influences yield and quality. Composting is a microbiological process where organic matter is partially decomposed by microorganisms under controlled conditions. Proper compost preparation is the foundation for successful mushroom farming.
Summary of Button mushroom
- Compost for button mushrooms is made by mixing chopped wheat or paddy straw with nitrogen-rich manure, gypsum, urea, bran, and water to create a nutrient-rich substrate.
- It undergoes two phases: Phase I microbial heating up to 70 °C, and Phase II pasteurization at 52–60 °C to kill pathogens and prepare the compost for fungal growth.
- Before spawning, the compost’s moisture (65–73%), pH (6.5–7.5), and texture are optimized to ensure healthy mycelium development and high mushroom yield.
Table of Contents
Understanding Button Mushroom Requirements
Biological Needs of Button Mushrooms
Button mushrooms are secondary decomposers, meaning they grow on partially decomposed organic matter. They require nitrogen-rich, fibrous substrates with proper moisture content and aeration. Temperature and microbial balance in the compost are crucial to ensure efficient colonization by the mycelium.
Importance of Compost in Mushroom Cultivation
Compost provides the essential nutrients and structure for mushroom growth. It acts as a habitat for beneficial microbes that compete against pathogens, supports moisture retention, and ensures air exchange. A well-prepared compost also minimizes contamination and improves the biological efficiency of the crop.
Types of Composting Methods for Button Mushrooms
1. Long Method of Composting (Outdoor Method)
This traditional technique is carried out in open-air environments and takes about 28-30 days to complete. It requires regular turning and careful management of temperature and moisture.
Advantages:
- Cost-effective and simple
- Suitable for small-scale growers
Disadvantages:
- Susceptible to weather conditions
- Takes longer time and requires more labor
2. Short Method of Composting (Indoor Method)
This modern method is done under controlled conditions inside composting units or tunnels, usually completed in 14-18 days. It includes pre-wetting, Phase I composting, and Phase II pasteurization.
Advantages:
- Faster and more consistent
- Less labor-intensive
Disadvantages:
- Requires infrastructure and higher initial investment
Raw Materials Used in Compost Preparation
1. Base Materials (Carbon Source)
Wheat straw or paddy straw is the primary component, providing cellulose and lignin. These materials offer bulk and structure while serving as a carbon source for microbial activity.
2. Nitrogen Sources
Chicken manure, horse dung, or urea are added to supply nitrogen. Adequate nitrogen is essential for microbial proliferation and for initiating the composting process.
3. Supplements
Additional supplements such as gypsum, molasses, bran, and ammonium sulfate improve compost texture and nutrient content.
4. Water
Moisture is vital for microbial action. Optimal water content (65-70%) must be maintained throughout the process.
Phases of Composting
1. Pre-wetting Phase
The raw materials are soaked and mixed thoroughly for 2-3 days to achieve uniform moisture content. This prepares the substrate for microbial colonization.
2. Active Composting Phase (Phase I)
In this phase, microbial activity is at its peak. The temperature rises to 70-75°C due to decomposition, and the compost is turned regularly to maintain aeration and homogenize the mixture.
3. Pasteurization and Conditioning (Phase II)
The compost is pasteurized at 57-60°C for 6-8 hours to kill pests and pathogens. After pasteurization, the compost is conditioned at 48-52°C for 3-5 days to remove ammonia and make it selective for mushroom growth.
Steps for Outdoor (Long Method) Composting
1. Site Selection and Setup
A concrete platform is preferred to avoid contamination. Shade and drainage should be ensured.
2. Layering of Materials
Straw is spread and watered, followed by alternating layers of manure and supplements. This layering continues until the heap reaches about 1.5 meters in height.
3. Turning Schedule
- 1st turning: After 4 days
- 2nd turning: After 8 days
- Subsequent turnings: Every 4 days till Day 24
- Final turning: Day 28 (compost should be dark brown, soft, and free of ammonia)
Steps for Indoor (Short Method) Composting
1. Pre-wetting and Mixing
Raw materials are soaked and mixed uniformly for 2 days.
2. Phase I (Active Decomposition)
Carried out in a bunkered unit or open floor, this lasts 7-10 days with frequent turning and temperature monitoring.
3. Phase II (Pasteurization and Conditioning)
The compost is shifted to a pasteurization chamber. Temperature is raised to 60°C to kill pathogens, then reduced to condition the compost for mushroom growth.
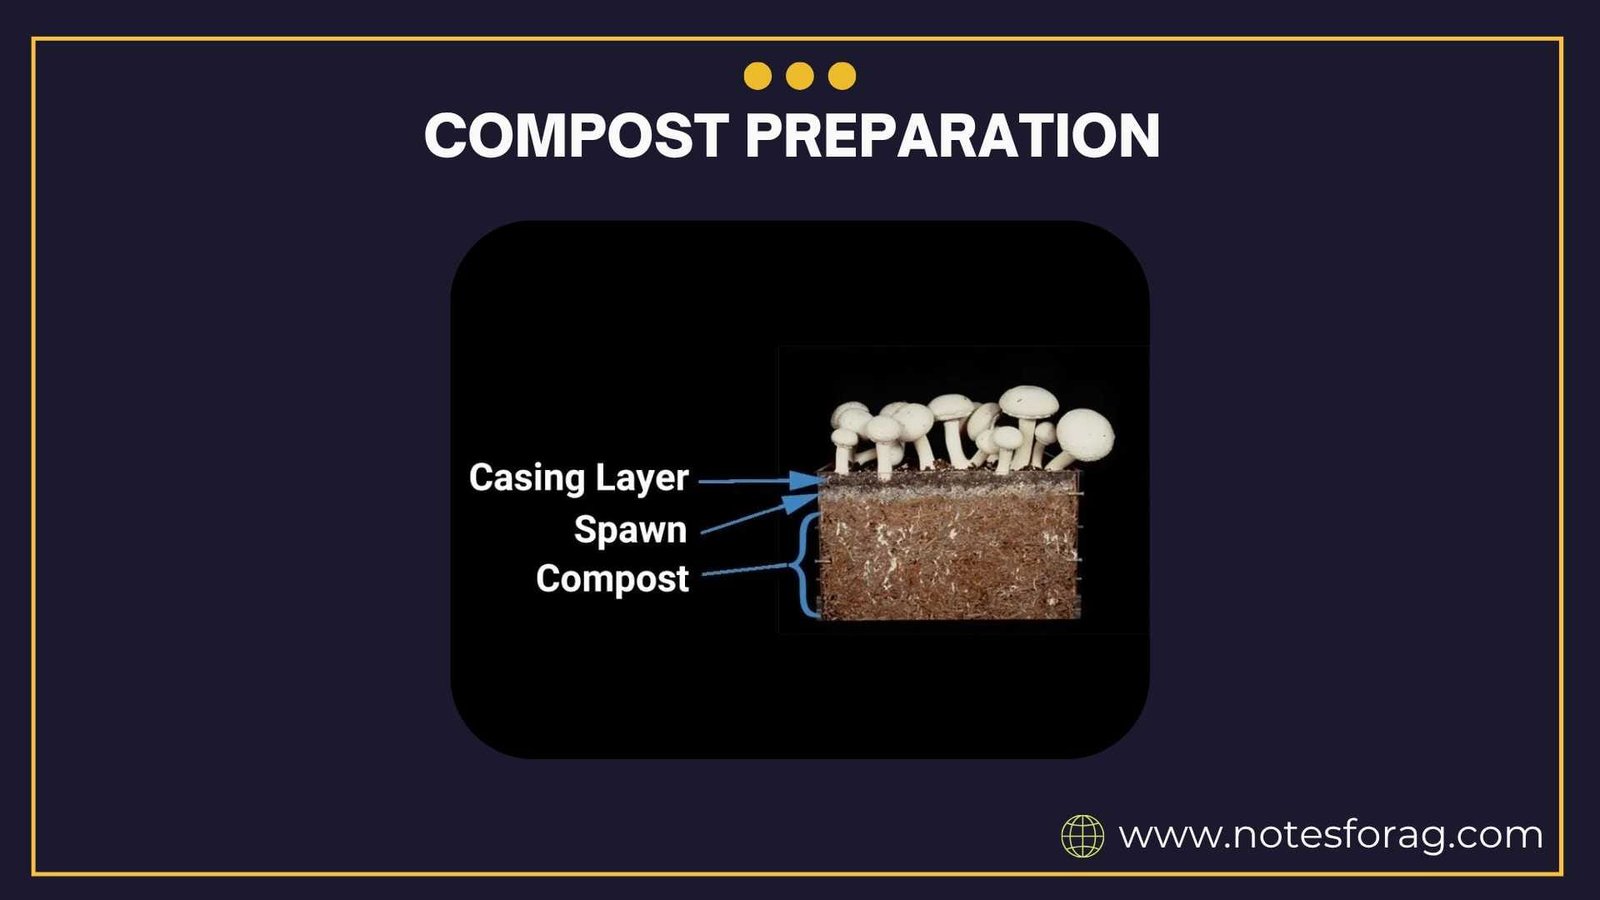
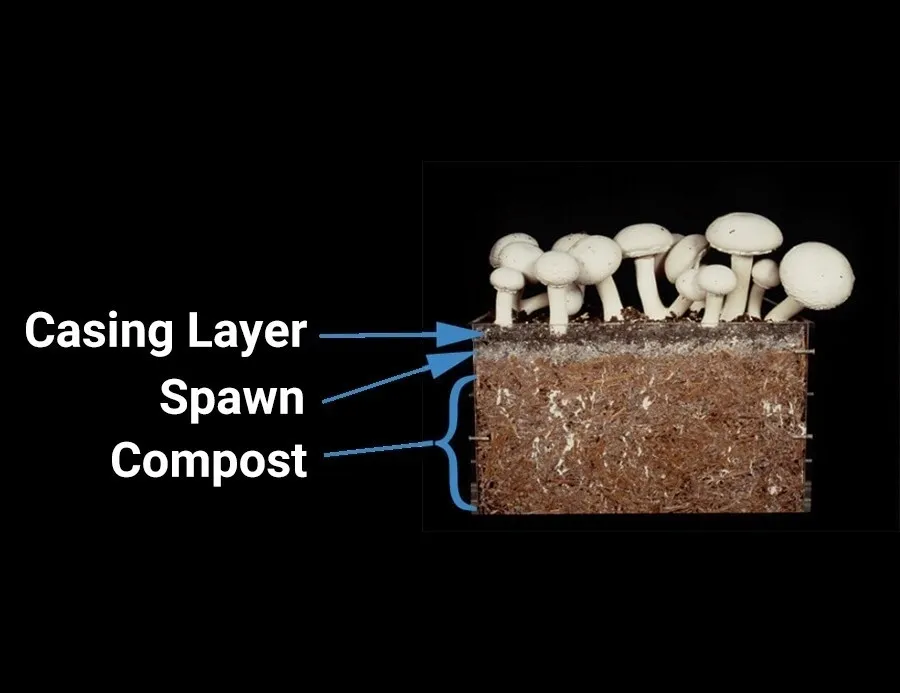
Qualities of Good Compost of button mushroom
The Qualities of Good Compost of button mushroom are,
1. Appearance and Texture
Good compost should be dark brown, moist, and crumbly with a pleasant earthy smell.
2. Chemical Composition
Ideal compost has a C:N ratio of around 17:1, moisture content of 65%, and pH between 6.5 and 7.5.
3. Absence of Toxins

Compost should be free from pesticides, heavy metals, and ammonia, as these hinder mycelium development.
Common Problems in Composting button mushroom and Solutions
1. Excess Ammonia
Caused by too much nitrogen or poor aeration. Solution: Increase turning and ensure proper moisture levels.
2. Low Temperature Rise
Occurs due to insufficient nitrogen or water. Solution: Add manure and water to stimulate microbial activity.
3. Foul Odors or Anaerobic Conditions
Results from waterlogging or compaction. Solution: Improve drainage and aerate the heap.
Conclusion
Compost preparation is a critical step in successful button mushroom cultivation, as it directly influences the quality and yield of the crop. The process begins with selecting and mixing suitable raw materials, primarily chopped wheat or paddy straw combined with nitrogen-rich organic matter such as horse or chicken manure. These ingredients are carefully balanced with additives like gypsum, urea, and bran to ensure the substrate is rich in essential nutrients required for fungal growth. Water is added to achieve the right moisture content, which is vital for microbial activity and later for mycelium development.
The composting process itself occurs in two important phases. In Phase I, microbial activity generates heat, raising the temperature of the compost pile to approximately 70 degrees Celsius. This intense heating helps break down the raw materials and initiates the decomposition process, making nutrients more available. Phase II involves pasteurization, where the compost is maintained at 52 to 60 degrees Celsius to eliminate harmful pathogens and unwanted organisms. This step is essential to create a safe and conducive environment for the mushroom spawn to colonize.
Once pasteurization is complete, the compost is carefully monitored for key parameters such as moisture content, pH level, and texture. Optimal moisture levels (typically between 65 and 73 percent) and a near-neutral pH (around 6.5 to 7.5) provide the ideal conditions for mycelium to grow vigorously. The texture of the compost is also adjusted to ensure adequate aeration and water retention, preventing problems such as compaction or drying out.
In summary, the careful preparation and conditioning of compost form the foundation of healthy mushroom cultivation. Attention to raw materials, microbial phases, and substrate testing results in a nutrient-rich, pathogen-free medium that supports strong mycelial growth and ultimately leads to higher mushroom yields. Mastering these compost preparation techniques is crucial for growers aiming for sustainable and profitable button mushroom production.
Frequently Asked Questions (FAQs)
What ingredients are used in button mushroom compost?
Button mushroom compost is primarily made from chopped wheat or paddy straw, which provides carbon and structure. This is combined with nitrogen-rich materials like horse or chicken manure, along with gypsum to balance pH, urea and wheat bran for additional nutrients, and water to activate microbial activity. Together, these ingredients form a nutrient-dense, fibrous base that supports healthy mycelium colonization and high mushroom yield.
What are the phases of composting for button mushrooms?
Composting involves two main phases:
Phase I (Pre-conditioning) – This is the aerobic fermentation stage where microbial decomposition generates high internal heat (around 70 °C), breaking down organic matter.
Phase II (Pasteurization) – The compost is heated to 52–60 °C for several hours to kill harmful microbes, pests, and weed spores, while also conditioning the compost to make it ideal for mushroom spawn colonization.
How do you maintain compost health during preparation?
Compost health is maintained by keeping moisture content between 65–73% (moist but not soggy), and adjusting the pH to a neutral range of 6.5 to 7.5. Turning the compost pile every 2 to 4 days ensures uniform temperature, aeration, and microbial activity throughout the substrate, which helps prevent anaerobic spots or uneven decomposition.
Why is pasteurization critical in button mushroom composting?
Pasteurization plays a crucial role by eliminating harmful organisms such as nematodes, fly larvae, and competing fungi. It also helps convert ammonia produced during early fermentation into microbial proteins that are safe for mushroom growth. This step ensures a clean, selective environment where only the desired mushroom fungi can thrive effectively.
How long does making button mushroom compost take?
The long method of composting, commonly done outdoors, takes 28 to 30 days and relies on natural microbial activity with regular turning. The short method, often practiced indoors, uses steam pasteurization and intensified turning schedules to complete the process in 16 to 20 days, making it more time-efficient and suitable for commercial growers.
Related Articles